Recording videos and images from live capture
You can record still images and videos of the live stream of the camera.
An important aspect of this function is that you always record what is shown on screen (And not necessarily the action that the camera is currently filming). This means that drawings will also appear on the image or video, and if you apply a delay, it is the delayed action that will be recorded.
1. Recording still images
To record a still image use the Save image button 
The image, including drawings, will be instantly saved in the configured directory (see Saving directories below).
2. Recording videos
To record a video use the Start recording video button 
The recording button will change in aspect, to stop recording the video, use the same button.
After the recording completes, a thumbnail of the recorded video will appear under the main image. You can perform some operations on the recorded file from the context menu of this thumbnail.
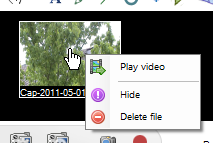
Play video: adds a Playback screen and loads the video in it. This option will not close the current capture screen.
Hide: hides the thumbnail without deleting the file.
Delete file: sends the recorded file to the trash bin.
3. Saving directories
You can specify the location of saved images from the global preferences dialog.
Use menu Options > Preferences…, then go to the Capture tab and the general tab. Change the settings to your preferred locations.

4. Image and video format
You can change the format of the saved images or video from the global preferences dialog.
Use menu Options > Preferences…, go to Capture tab and the general tab. Select a format in the Image or Video format list.
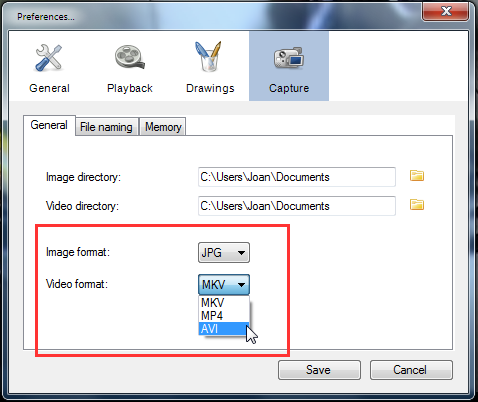
For video, the encoding used will be MPEG-4 ASP (equivalent to Xvid or DivX).
5. Automatic file naming
When saving a still image or a video, Kinovea will generate a file name to be ready for the next save operation. This allows you to record several videos or images in a row without caring about renaming the file each time in between.
This option is set from the preferences, select menu Options > Preferences…, go to Capture tab, and then to "file naming" tab.
The default option is Free text with automatic counter.

You can opt for two kinds of file naming scheme for maximum flexibility.
A. Free text with automatic counter
The first option "Free text with automatic counter" might be sufficient in many scenarios. It works by looking for a number in the text you enter on the main capture screen window, and increment that number each time you record a new file. If no number is found, it is automatically appended for the second file name generated.
A typical application of this option during a recording session might look like the following:
| Original text | Alice |
|---|---|
| Second recording | Alice - 2 |
| Third recording | Alice - 3 |
| … | … |
 Only the last number is incremented, so if your free text is "Exercise 3 - Attempt 5", the next file name will be "Exercise 3 - Attempt 6".
This option allows you to change the file name at anytime without going to the preferences dialog.
B. Naming pattern
The second option "Naming pattern" lets you set a filename that will automatically include the date and time as well as a auto incrementing counter.
It works by replacing specially formatted keys with their corresponding values in the final file name. You are free to add as many or as few of these special keys you want, and place them where you want in the file name. Around the keys, the text is free (with the usual restrictions on some characters for Windows filenames).
The auto incrementing counters are independent from each other and independent from the Free text with automatic counter option.
Some examples (incrementing counter is at 5):
| Pattern | Filename |
|---|---|
| test | test |
| test-%i | test-5 |
| test %y%mo%d | test 20110414 |
| %y.%mo.%d.T.%h.%mi.%s.Z | 2011.04.14.T.16.05.32.Z |
| %y-%mo-%d - test - %i | 2011-04-14 - test - 5 |
| %d-%mo-%y - %i | 14-04-2011 - 5 |
| test - %h%mi | test - 1605 |
See also: