Tracking objects or body joints
1. Tracking workflow
The steps involved in tracking an object (or a body joint) in Kinovea are the following:
- Right click the object to track and use the menu Track Path.
- Move the video forward using the Play button, the Next Frame button or the Mouse Wheel.
- Adjust point location when necessary during the Path creation.
- To finish tracking, right-click and use the menu End Path Edition.
Tracking is a semi-automatic process. The points location is computed automatically but you can adjust them at any time.
2. Choosing the object to track
To improve automatic tracking results, the object to track should be well contrasted and feature rich.
The shape of the object should not change much during the tracking.
You may also consider the use of tracking stickers or reflective stickers to improve the results.
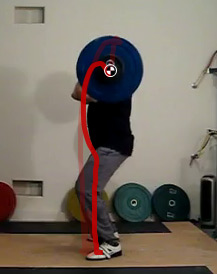
3. Path creation
When the tracking is in progress, you will see two rectangles around the object being tracked.
The inner rectangle is the feature window [A], while the outer rectangle is the search window [B].

When the automatic tracking fails, you can correct the point location by dragging the search window. Drag it until the cross at the center of the tracking tool is at the correct location.
When tracking resumes, it will take this new point as reference.
4. Interacting with the Path track
Once you are at the last image of the Path you want to track, end the tracking by right clicking the tool and using the menu End Path Edition.
The rectangles disappear.
All points location are locked.
The Path is now interactive and you can jump to any image by clicking on the corresponding point.
Drag the target along the trajectory to browse the motion.
 If some points are misplaced, go to the image corresponding to the misplaced point, right-click the path and use menu Restart Path Edition.
Adjust the point location and return to interactive mode by right-click + End Path Edition.
5. Configuring display options
Right click on the Path track and use the menu Configuration to access the display options.
The following settings are available:
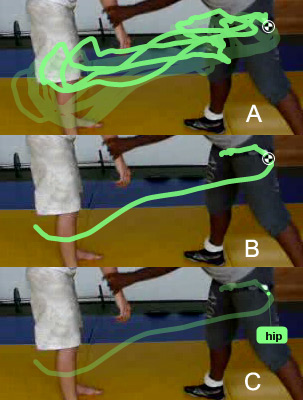
Display modes
The Path track can be in one of three mode:
- [A] - Complete path - All the path is drawn all the time. (This is the default option).
- [B] - Path section around current image - Only a small section of the path is drawn, typically 25 images around the current point.
- [C] - Label following the path - Only a small section of the path is drawn, and the defined label is displayed at the current point.
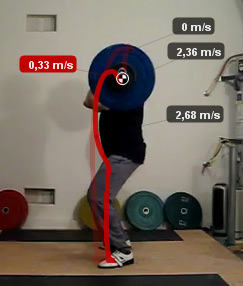
Measurement
Additional information on total distance or speed can be displayed by choosing one of the options:
- Distance - The total distance between the start of the path and the current point.
- Speed - The average speed of the last segment of the path.
To express distance and speed in real world units, you must first add a line and set its real length as described in Measuring distances.
Key images
When key images are within the time boundaries of the path, they are displayed as small labels attached to their image position.
You can move the key images labels around to clarify the view.
When using one of the measurement display option, the key image labels will display the distance or speed of their respective position.
See also: